
The Ultimate Guide to Measuring and Fitting a Glass Splashback is for UK homeowners who want a clean, accurate finish without costly measuring errors.
A well-fitted glass splashback can make a kitchen feel brighter, cleaner, and more modern. It protects your wall from heat, steam, water, and cooking splashes while giving the room a smooth, stylish finish. If you are planning a kitchen renovation UK project or upgrading the area behind your hob, accurate measuring is the best place to start.
For homeowners who want a precise result, IM Glass offers made-to-measure kitchen glass splashbacks designed around your kitchen layout, colour choice, and practical needs.
Why Accurate Measuring Is Crucial for Glass Splashback Installation
Glass splashback fitting depends on accuracy. Unlike timber, acrylic, or tile trims, toughened glass splashbacks cannot be cut, drilled, or reshaped after they have been manufactured. If a panel is made to the wrong size, it usually needs to be remade.
Accurate measuring helps you avoid:
- Gaps around cupboards, worktops, and cooker hoods
- Socket cut-outs in the wrong position
- Panels that are too tight to install safely
- Uneven edges that draw the eye
- Extra delays during your kitchen renovation
This is important in many homes across England. Older walls may bow slightly. Worktops may sit a few millimetres out of level. Cabinets can also vary, especially in kitchens that have been altered over time.
Good measuring gives the manufacturer clear information. It also helps the installer understand what they are working with before the panel arrives on site.
Common Measuring Mistakes Homeowners Make
One of the biggest mistakes is measuring the wall once and assuming that number is correct. A splashback area can be wider at the top than at the bottom, especially between two wall units.
Another common issue is measuring in centimetres rather than millimetres. For kitchen glass splashback installation, millimetres are the standard because they give a much more accurate result.
Homeowners also often forget to include:
- Socket and switch positions
- Extractor hood height
- Upstands or trims
- Window sills
- Uneven tile edges
- Gas pipes or isolator switches
- The thickness of existing wall coverings
Some people measure before the kitchen is fully fitted. This can cause problems if the worktop, wall units, or cooker hood move during installation. Always measure once the fixed items are in their final position.
Tools You Need Before Measuring
You do not need specialist equipment for basic measuring, but you do need to be careful. Gather everything before you begin so you are not rushing.
Useful tools include:
- A metal tape measure
- A spirit level
- A pencil
- Masking tape
- A notepad or printed sketch sheet
- A straight edge
- A square or angle finder
- A phone camera
- A laser measure, if available
Avoid using a soft sewing tape or a damaged tape measure. Even a small bend or stretch can affect the reading.
It also helps to sketch the wall before you measure. Mark the hob, cupboards, extractor, sockets, switches, corners, and any unusual shapes. The sketch does not need to be artistic; it just needs to be clear.
Step-by-Step Guide to Measuring a Glass Splashback
If you are wondering how to measure splashback areas properly, start with the finished kitchen layout. Worktops should be fixed. Wall units should be installed. Extractor hoods should be in place. Sockets should also be in their final positions.
Measure slowly and write everything down in millimetres. Check each number at least twice.
Measuring Wall Width and Height
Start with the width of the area where the glass will sit. Measure across the bottom, middle, and top of the space.
For example, if you are measuring behind a hob, take the width:
- Just above the worktop
- Halfway up the wall
- Just below the cooker hood or wall unit
If the measurements differ, do not guess. Write each one down clearly. A professional can then decide the best tolerance to allow for safe fitting.
Next, measure the height. Take measurements on the left, in the centre, and on the right. This matters because worktops and cupboards are not always level.
For full-height glass kitchen panels, measure from the worktop to the underside of the wall units, shelf, or ceiling detail. For a simple hob splashback, measure from the worktop to the bottom of the extractor hood or desired finished height.
You should also check the corners. If two walls meet at an angle that is not square, a standard rectangular panel may not sit neatly. In that case, bespoke measuring may be needed.
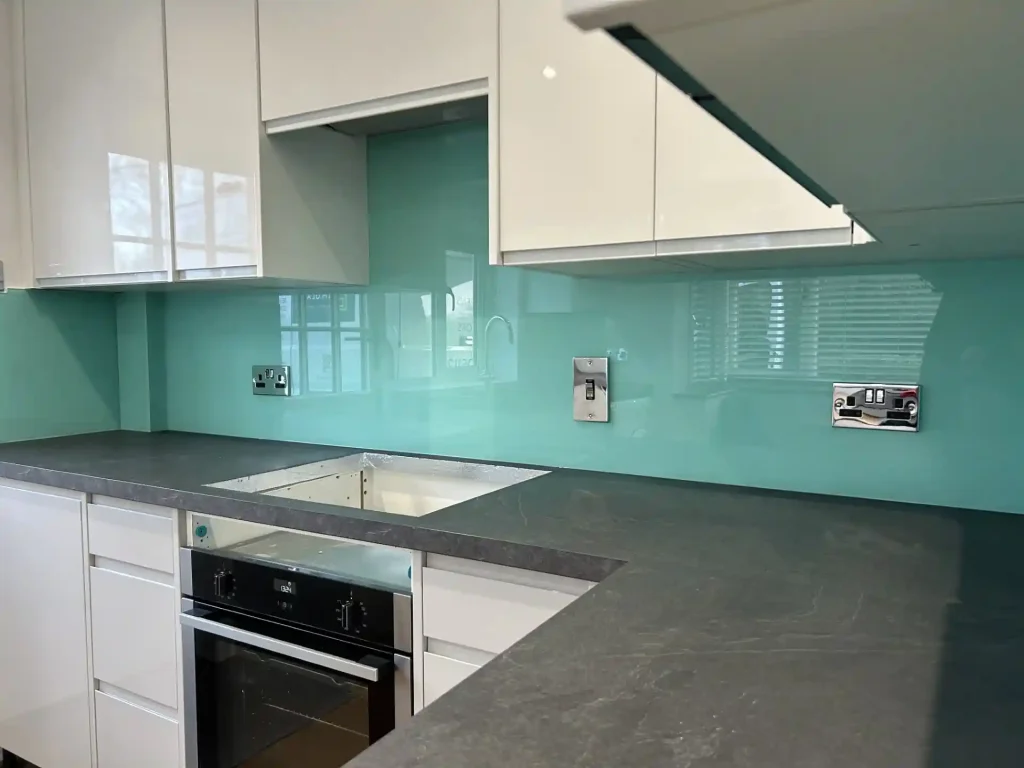
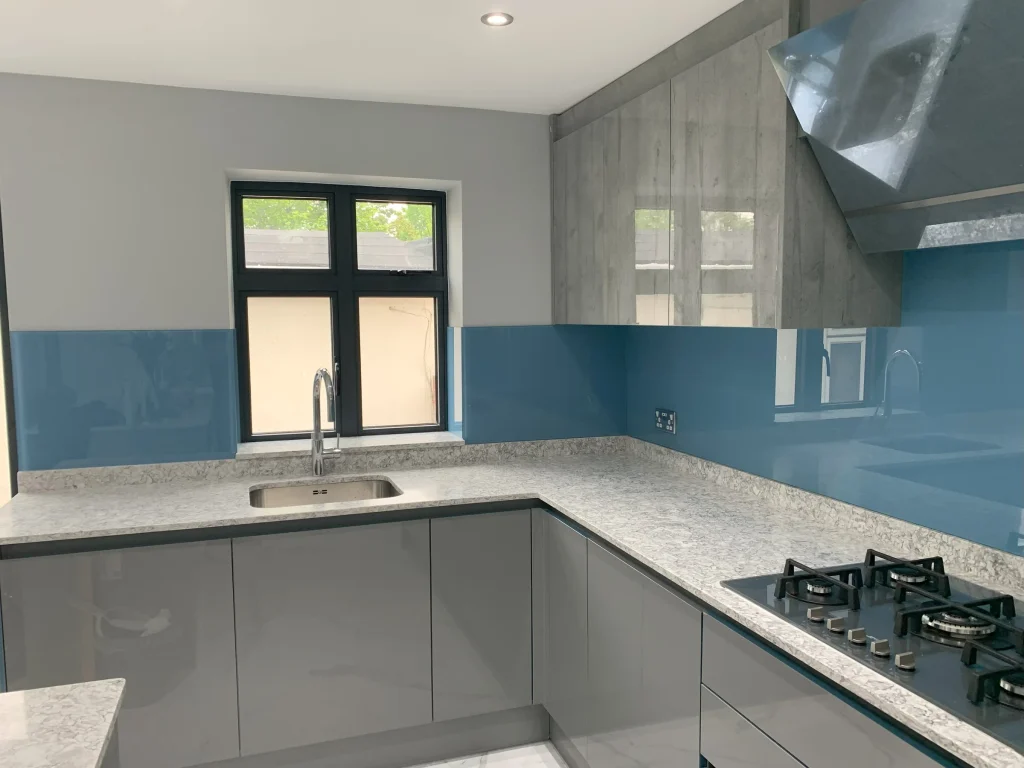
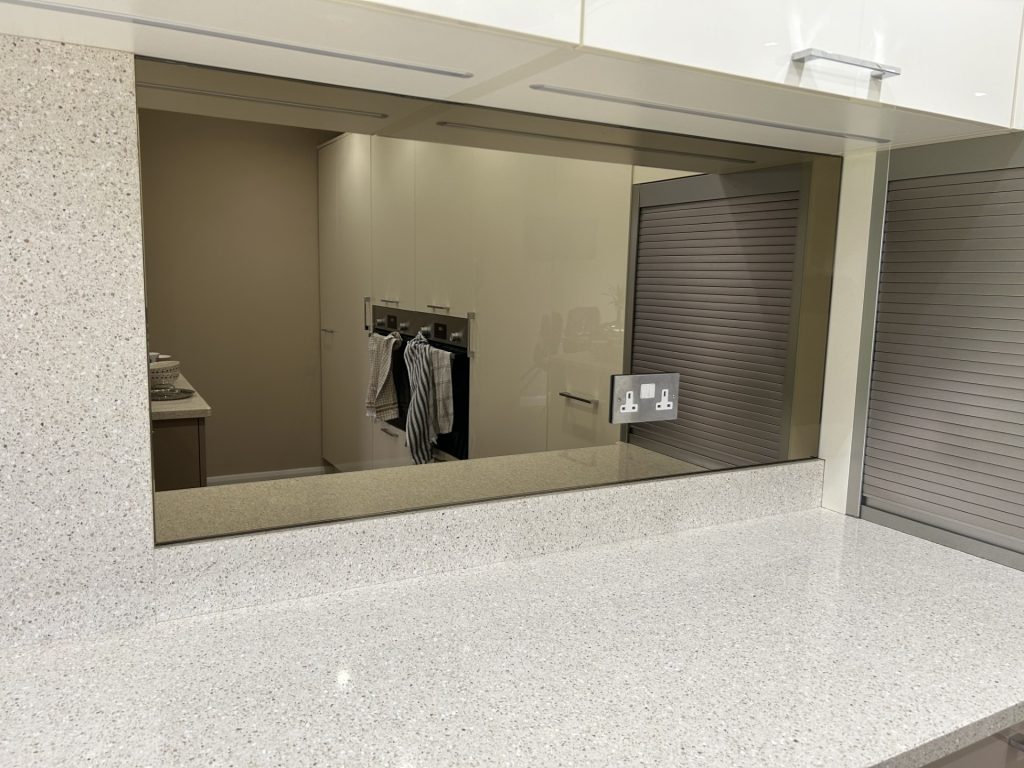
Accounting for Sockets and Fixtures
Sockets are one of the most important parts of any splashback installation guide. A socket cut-out in the wrong place can make the whole panel unusable.
Measure each socket from fixed reference points. Usually, this means measuring from the left edge of the splashback area and from the bottom edge above the worktop.
Record:
- Distance from the left edge to the socket
- Distance from the bottom edge to the socket
- Socket width and height
- Distance between multiple sockets
- Position of switches, spurs, or isolators
Always measure to the actual opening or box position, not just the faceplate. Faceplates are larger than the electrical box and usually sit on top of the finished glass.
If you need to remove a faceplate to check the position, switch off the power first. If you are not confident, ask a qualified electrician. Safety matters more than speed.
Also look for other obstacles. These may include pipework, cooker hood brackets, trims, shelf supports, and window reveals. For bespoke glass splashbacks, these details can often be included in the design.
The Ultimate Guide to Measuring and Fitting a Glass Splashback
Measuring and fitting are two separate stages, but they depend on each other. A perfect panel can still look poor if the wall is dusty, damp, uneven, or badly prepared. A well-prepared wall cannot save a panel that has been measured incorrectly.
The best approach is to treat the project as a sequence:
- Finish the kitchen layout.
- Measure the space in millimetres.
- Check socket and fixture positions.
- Confirm the glass specification.
- Prepare the wall.
- Dry-fit the panel.
- Apply the correct adhesive.
- Seal and finish neatly.
This approach works whether you are fitting a small hob panel or planning a larger set of made-to-measure splashbacks across the full wall.
For many UK homeowners, the safest option is to understand the process but use an expert for the final measure and installation. This reduces risk and helps achieve the clean finish expected in modern UK kitchens.
How to Fit a Glass Splashback Safely and Correctly
Fitting a glass splashback is not just a case of putting adhesive on the back and pressing it to the wall. You need the right surface, the right product, careful handling, and enough time to align the glass properly.
Before starting, inspect the panel. Check the size, colour, finish, edges, and cut-outs. Do not fit the glass if you notice chips, cracks, or damage.
You should also do a dry fit. This means placing the panel in position without adhesive to check that it lines up correctly. Larger panels are heavy, so always have another person to help.
Preparing the Wall Surface
The wall should be clean, dry, smooth, and stable. Remove loose paint, dust, grease, old adhesive, and flaky plaster. If the wall has been newly plastered, let it dry fully before fitting the glass.
Glass needs even support. If the wall has raised lumps, broken tiles, or heavy ridges of adhesive, the panel may not sit flat. This can create pressure points.
You can fit some splashbacks over existing tiles, but only if the tiles are firmly attached and level. Loose tiles should be removed. Any damp or crumbling areas should be repaired first.
Clean the back of the glass as well. Dust or grease can reduce adhesion and affect the final bond.
Adhesive and Fixing Methods
Most glass splashbacks are fitted with specialist glass or mirror adhesive. This type of adhesive is designed to work with coated glass and reduce the risk of damaging the backing.
Apply the adhesive according to the manufacturer’s instructions. It is often applied in vertical lines or evenly spaced blobs. Avoid putting adhesive too close to the edge, as it may squeeze out when the panel is pressed into place.
Some panels can be mechanically fixed with screws and caps. However, any holes must be made before the toughening process. Never try to drill toughened glass on site.
For larger panels or more complex layouts, a professional installer may use packers, temporary supports, and specialist handling tools. This helps keep the panel level while the adhesive cures.
Alignment and Finishing Touches
Once the adhesive is applied, lift the glass into position carefully. Line up the bottom edge first, then bring the panel gently back towards the wall.
Check the alignment before pressing firmly. Make sure:
- The panel is level
- The side gaps are even
- Socket cut-outs line up
- Corners are not under pressure
- The bottom edge sits neatly above the worktop
Use temporary packers if needed to maintain a small, even gap. Once the adhesive has cured, seal the bottom edge with a suitable silicone sealant. This prevents water, grease, and food splashes from getting behind the glass.
Refit socket faceplates only when it is safe to do so. The faceplate should sit over the glass, giving a neat finished look.

DIY vs Professional Installation in the UK
DIY kitchen splashback fitting can be suitable for simple projects. However, glass is heavy, rigid, and unforgiving. A small error can lead to an expensive replacement.
The right choice depends on your skills, the size of the panel, the wall condition, and whether you need cut-outs.
When You Can Do It Yourself
You may be able to fit a glass splashback yourself if the panel is small, rectangular, and has no socket cut-outs. A simple hob splashback is often the most realistic DIY option.
DIY may be suitable when:
- The wall is flat and clean
- The panel is easy to lift
- There are no complex shapes
- You have the correct adhesive
- You have someone to help
- You are confident checking levels and alignment
Even then, you should work slowly. Protect the worktop with a soft covering. Wear gloves. Never force the glass into position.
If the panel does not fit during the dry fit, stop. Do not try to grind, drill, or trim toughened glass.
Why Professional Fitting Is Recommended
Professional fitting is recommended for larger panels, socket cut-outs, shaped glass, full-height designs, and uneven walls. These are common features in modern UK kitchens.
A professional installer understands tolerances, safe handling, wall preparation, and adhesive curing. They can also spot issues before they become costly problems.
Using a splashback installation service can save time and reduce risk. This is especially useful during a wider kitchen renovation, where delays can affect other trades.
A professional splashback fitting service also gives you a more polished result. Edges, seals, sockets, and joins are finished with care, which makes a big difference to the final appearance.
Cost and Time Expectations for Installation in the UK
The cost of toughened glass splashbacks varies because every kitchen is different. Size, shape, thickness, colour, finish, cut-outs, and fitting requirements all affect the final price.
A small plain panel will usually cost less than a full run of coloured or printed glass with several sockets. Access can also affect installation time, especially in flats, narrow terraces, or homes with awkward stairs.
Average Installation Time
Once the glass has been made, a straightforward installation may take a few hours. More complex projects can take longer, especially if there are several panels or difficult cut-outs.
The full process usually includes:
- Measuring or site survey
- Design and specification
- Glass cutting and shaping
- Toughening
- Delivery
- Installation
- Sealing and finishing
The manufacturing stage often takes longer than the fitting stage. This is normal because the glass must be prepared accurately before it is toughened.
If you are working to a renovation schedule, plan ahead. Do not leave splashback decisions until the last moment, especially if you want a bespoke colour or shaped panel.
Typical Cost Factors
The main cost factors include:
- Overall panel size
- Glass thickness
- Number of panels
- Socket and switch cut-outs
- Polished edges
- Shaped corners or notches
- Colour choice
- Printed or specialist finishes
- Site survey
- Professional installation
- Delivery location in England
Kitchen renovation trends in the UK show growing demand for easy-clean, low-maintenance surfaces. Glass is popular because it has no grout lines and wipes clean quickly.
Cheaper options may look appealing at first, but poor measuring or low-grade fitting can cost more later. A well-made glass splashback should last for years, so accuracy and durability are worth prioritising.
Why Choose IM Glass for Splashback Installation
Choosing the right glass company is just as important as choosing the right colour. You need a team that understands design, measurement, manufacturing, and installation.
IM Glass works with homeowners who want practical, stylish glass features made to suit their homes. For splashbacks, that means accurate measuring, safe materials, and a finish that complements the kitchen.
Made-to-Measure Accuracy
Every kitchen has its own quirks. Cupboards may not sit square. Walls may lean slightly. Worktops may have small variations across the run.
IM Glass provides custom splashback solutions designed around real spaces, not standard assumptions. This helps reduce gaps, awkward joins, and poor alignment.
Made-to-measure glass is especially useful for British homes where kitchens have been extended, altered, or modernised over time. It gives you a cleaner result than trying to force a standard panel into a non-standard space.
Expert Installation Team
The installation stage affects how the splashback looks and performs. Even a correctly made panel needs careful handling and fitting.
Experienced installers know how to manage weight, adhesive, wall conditions, socket faceplates, and neat sealing. They also understand when a wall needs extra preparation before fitting.
If you want a stress-free finish, professional installation is often the best route. It removes guesswork and helps protect your investment.
High-Quality Toughened Glass
Kitchen splashbacks need to cope with heat, steam, moisture, and daily cleaning. Toughened glass is designed to be stronger and safer than standard glass, making it suitable for kitchen use.
High-quality toughened glass splashbacks also offer a smooth, non-porous surface. This makes them easy to clean and more hygienic than tiled areas with grout lines.
With the right specification, glass kitchen panels can suit both traditional and modern kitchens. You can choose clear, coloured, neutral, bold, or bespoke finishes depending on the look you want.
Frequently Asked Questions
1. Can I measure a glass splashback myself?
Yes, you can measure a simple splashback yourself if you are careful and work in millimetres. However, it is always recommended to have a professional measure and install the glass kitchen panels for the best results.
2. Can I choose any colour for my glass splashback?
Yes, you can choose from a wide range of colours for your glass splashback. You can also opt for custom colours or bespoke designs to suit your personal style and home decor.
3. Are glass kitchen panels easy to clean?
Yes, glass kitchen panels are incredibly easy to clean. They do not have grout lines like tiled areas, which makes them more hygienic and low maintenance. Simply wipe with a damp cloth and mild detergent to keep them looking shiny and new. You can also use special glass cleaning solutions for a streak-free finish.
4. How do I install a glass splashback?
Installing a glass splashback requires some basic DIY skills and tools. It is recommended to hire a professional installer for the best results
Final Thoughts
The Ultimate Guide to Measuring and Fitting a Glass Splashback highlights how important careful planning is before starting any installation. A glass splashback is not just a decorative feature it needs precise measurements to ensure it fits perfectly between cabinets, worktops, and sockets without any gaps or alignment issues.
Using the correct tools such as a tape measure, spirit level, and template paper helps you avoid costly mistakes. Even a small measuring error can affect the final look, so double-checking every dimension is essential. Taking time at the beginning to mark reference points and confirm wall flatness will make the fitting process much smoother.
During installation, accuracy continues to matter. Ensuring the wall is clean, dry, and properly prepared allows the adhesive to bond securely. Careful handling of the glass panel is also important to prevent damage or misalignment. Once fixed in place, the splashback should sit evenly and align perfectly with surrounding surfaces for a seamless finish.